Purpose: In a transition setting, little elements are overlooked within the big picture. For example, when players go 1 on 1 full court, the focus tends to be on sprinting down the court. As a result, players forget to block out prior to transitioning down the court. This drill stresses all areas of 1 on 1 defense and offense. Players are required to do the little things or they will be penalized accordingly. The elements used in this workout will numerous and can translate into better defensive … [Read more...]
5 on 5 Random Movement
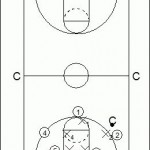
Purpose: To teach transition basketball while in a half court situation. Both the defense and offense need to react quickly to a change of possession. Drill: 5 players on offense, 5 players on defense. Coach or manager at top with the basketball. The offense will run any offense without the ball while the coach can: 1-shoot to test rebounding 2-give to offense and let them run with ball 3-throw it out for a loose ball 4-hit a player in the back if they aren't looking = turnover 5-Run … [Read more...]
Diamond Press Zone Defense
Diamond 3: Full Court Rules for Top or Point Person - X1 Number one priority - no penetration down the middle. Keep pressure on the ball at all times. (Note: Even though the pickup point of the defense might call for the Top or Point to pick up at the free throw line, the Top or Point is allowed a great deal of leeway in picking the ball up early. Remember: we want pressure on the ball even if the Point's position has to be somewhat extended. Push the ball out of the … [Read more...]
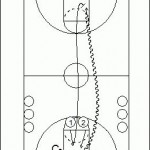
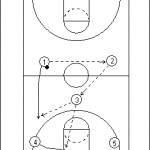
High-Low Post Play
The high-low post play is designed to get a quick high or low post scoring opportunity for the post players. 1) The set begins with 4 and 5 in a tight stack at the free throw line. 2 and 3 are stacked outside the three-point line on the left wing. (This play could also be run to either side, and any player can be in any position -- but we are generally trying to get a post score with this play.) 2) The point guard, 1, dribbles to the right wing to set the play in motion. 4 … [Read more...]
Half Court Trap Attack Zone Offense
This half court press attack zone offense works great against those half court zone traps you will see from time to time, especially the 1-3-1 half court trap. It is a simple offense to run with a few options for attacking the trapping defense. 1) Option 1: O1 brings the ball up court and O2 stays even with O1. Prior to crossing the half court line, O1 passes to O2. (Remember, this is against a trap defense that is wanting to trap in the corners immediately once you cross the line.) After … [Read more...]
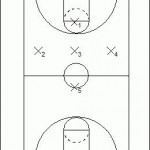
3 on 3 Full Court Drill
Purpose: To develop transition defense skills in a 3 on 3 situation. This drill also allows the offensive players to work on offensive transition. Drill 1: 3 on 3 Full Court Drill starts with the offense taking the ball out of bounds. The defense will pick up full court and pressure the entire time. The defense must be controlled and try to stop the score. When there is a score, rebound, or turnover, the drill is done and a new group will come onto the court. Drill 2: 3 on 3 Full Court Up … [Read more...]
High Screen for Jump Shot
This out of bounds play works well against any zone, but especially against a 2-3 zone defense. When the official hands the basketball to #3, 31 cuts to the ballside corner. #4 sets a screen, and #2 curls around #4 for a quick jump shot. … [Read more...]
High Stack Double Screen
The high stack is used to get the basketball into play. The low double screen and three point shot should be utilized at special times, such as to start a half or when a 3-pointer may be needed. #1 passes the basketball inbounds to #2 or #3 (in this diagram, #2 uses a screen for #3 to get open). After #1 passes, he cuts down and through to the far side, using a double screen set by #4 and #5. #2 dribbles to the weakside and looks to make a pass to #1 for a three-point shot in the … [Read more...]
Line Play
When the official hands the ball to #3, #2 pops out to the corner, #5 screens the middle zone defender, #4 flashes to the low block vacated by the defenders, and #1 flares deep as a safety valve. After passing, #3 enters the court to the weakside. The initial option to look for is the pass to #4. The pass should be lobbed high and away from the defense. … [Read more...]
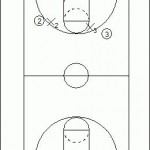
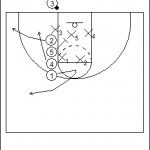
Lob Play or ‘3’
When the official hands the ball to #1, #5 sets a screen for #4 for a potential lob pass in front of the basket. #5 opens up to the basketball after setting the screen. #3 sets a flare screen for #2 and then sprints across the top of the key to behind the 3-point arc for a shot. … [Read more...]